How to Build a Document Signing App for Android
By Eamon Mallon | 2021 Jun 15

Remotely signing and sending important documents like contracts often takes more than it should. You may have to open the document and change the format in one application, then sign in another, or rely on a third-party signing service to bring required functionalities together.
In this tutorial, you'll learn how to build a full and fast mobile signing solution using the PDFTron Android SDK. The resulting app will let your users add signature, date, and text entry fields to a variety of documents including MS Office files, assign these fields to other users to complete via the same application, and then store the completed file in PDF.
We use Firebase for this example; but the same steps will work with any backend. Before we start, you can also check our Android showcase app to try these signing capabilities and more yourself.
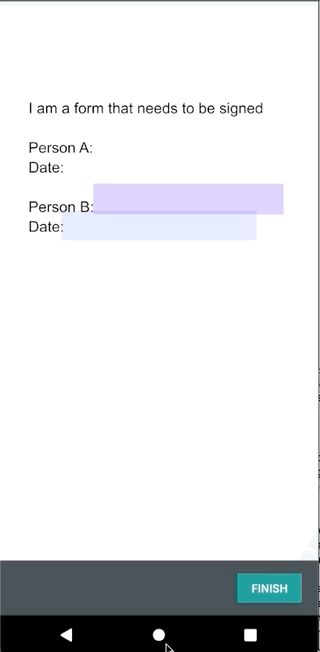
Here’s what we’ll be creating:
Step 1 - Add Firebase
For this example, we use Firebase for cloud storage and authentication. You can find an entire YouTube walkthrough of the Firebase setup here: Build a PDF signing app with React, Firebase and PDFTron SDK
Our signing sample project includes a Kotlin class called FirebaseControl. This handles communication between Firebase and our client app.
Set Up the Viewer to Add and Assign Fields
The sample signing app in GitHub contains extra fragments to display lists of documents signed and unsigned, and a fragment to allow users to add a list of people they want to assign to the annotations we’ll use for adding fillable date, text and signature fields.
(While not covered in this blog, code for these fragments is available in the GitHub sample.)
This next section shows how to create a viewer allowing a user to add a signature field, date field, and a text field to a document via annotations and then assign these annotations to another user to complete. We will set up our custom viewer using the ViewerConfig, ToolManagerBuilder and AnnotationToolbarBuilder API.
Create a Custom Date Field Tool
First, signature and text annotations come out of the box with the PDFTron SDK. So we won't need to create them. But we will need to create a custom tool class so users can add a date field to their document. This class will set some JavaScript to the field and show a date prompt to the user when they tap it.
You will create a class that inherits from the TextFieldCreate class. Next, override the createMarkup function and add the following code to create the date prompt. You can also find the DateFieldCreate class in the GitHub example.
@Throws(PDFNetException::class)
override fun createMarkup(pdfDoc: PDFDoc, bbox: Rect?): Annot? {
   val widget = super.createMarkup(pdfDoc, bbox)
   val dateAction: Action = Action.createJavaScript(
       pdfDoc,
       "AFDate_FormatEx(\"d/m/yy\");"
   )
   val aaObj: Obj = widget.sdfObj.putDict("AA")
   aaObj.put("K", dateAction.sdfObj)
   aaObj.put("F", dateAction.sdfObj)
   return widget
}
Set Up the Annotation Toolbar
Now we’ll build the annotation toolbar using the AnnotationToolbarBuilder API and add our DateFieldCreate class. The AnnotationToolbarBuilder API provides the option to add a custom button to the toolbar and assign it a button id, icon and title; we can use this API to add our custom DateFieldCreate tool. The following example also adds the signature field button, a text field button and an undo button.
private fun buildAnnotationToolbar(): AnnotationToolbarBuilder {
   return AnnotationToolbarBuilder
       .withTag("Sign Sample")
       .addToolButton(ToolbarButtonType.SIGNATURE_FIELD, CustomButtonId.SIGNATURE_FIELD)
       .addToolButton(ToolbarButtonType.TEXT_FIELD, CustomButtonId.TEXT_FIELD)
       .addCustomSelectableButton(
           R.string.date,
           R.drawable.ic_date_range_24px,
           CustomButtonId.DATE
       )
       .addToolStickyButton(ToolbarButtonType.UNDO, DefaultToolbars.ButtonId.UNDO.value())
       .addToolStickyButton(ToolbarButtonType.REDO, DefaultToolbars.ButtonId.REDO.value())
}
Configure the Viewer
Now we build our viewer configuration and add our tool manager. We will use the tool manager builder to register our DateFieldCreate. This allows us to manage the button press in our TabHostListener covered in a later step.
private fun toolManagerBuilder(): ToolManagerBuilder {
   return ToolManagerBuilder.from()
       .addCustomizedTool(DateFieldCreate.MODE, DateFieldCreate::class.java)
}
After adding the custom DateFieldCreate to the ToolManger, we build our ViewerConfig:
private fun createViewerConfig(): ViewerConfig.Builder {
   return ViewerConfig.Builder()
       .fullscreenModeEnabled(false)
       .multiTabEnabled(false)
       .documentEditingEnabled(true)
       .longPressQuickMenuEnabled(true)
       .showSearchView(true)
       .showBottomToolbar(false)
       .showTopToolbar(false)
       .toolManagerBuilder(toolManagerBuilder())
}
Assigning Annotations
Next, having created our custom date tool, annotation toolbar and set up our viewer config, we can display the viewer with the document the user wants to annotate with fields, and add event listeners to buttons so users can assign these fields to another user to fill.
fun buildViewerFragment(fileUri: Uri) {
   val tempDoc =
       Utils.duplicateInDownload(this, this.contentResolver, fileUri, "tempDoc").blockingGet()
   val config = createViewerConfig()
   config.addToolbarBuilder(buildAnnotationToolbar())
   // Create the viewer fragment
   mBasicAnnotationListener = MyBasicAnnotationListener()
   mPdfViewCtrlTabHostFragment =   ViewerBuilder2.withUri(Uri.fromFile(tempDoc)).usingConfig(config.build()).build(this)
   mPdfViewCtrlTabHostFragment.addHostListener(
       MyTabHostListener(
           { showBottomBar(false) },
           mPdfViewCtrlTabHostFragment,
           mBasicAnnotationListener
       )
   )
}
The first BasicAnnotationListener allows us to apply a customDataProperty to each annotation. We’ll use email addresses for this example. Later, during the signature collection stage, this custom property will determine what fields to hide or show for each user.
override fun onInterceptAnnotationHandling(
   annot: Annot?,
   extra: Bundle?,
   toolMode: ToolManager.ToolMode?
): Boolean {
   try {
       val annotEmail = annot?.getCustomData("email")
       if (annotEmail.isNullOrEmpty()) {
           annot?.setCustomData("email", currentUser.email)
       }
   } catch (e: Exception) {
       e.printStackTrace()
   }
   // return false so the other events can continue executing
   return false
}
The second TabHostListener is used to set our custom tool DateFieldCreate as an active tool in the current ToolManager.
override fun onToolbarOptionsItemSelected(item: MenuItem?): Boolean {
   if (item?.itemId == CustomButtonId.DATE) {
       val toolManager = mPdfViewCtrlTabHostFragment.currentPdfViewCtrlFragment.toolManager
       val tool = toolManager!!.createTool(DateFieldCreate.MODE, null)
       (tool as Tool).isForceSameNextToolMode = true
       toolManager.tool = tool
       return true
   }
   return false
}
Display the Document for Annotation
Now that our custom viewer is ready, we can use it to show the document for annotation with fields!
private fun showPdfViewCtrlTabHostFragment() {
   supportFragmentManager.beginTransaction()
       .replace(R.id.content_frame, mPdfViewCtrlTabHostFragment)
       .addToBackStack("PdfViewCtrlTabHostFragment")
       .commit()
}
Set Up the Viewer for Signature Capture
Once the document has fields added, we can now let other users view those fields assigned to them, sign and fill these in.
If you use the Firebase example from the Youtube tutorial, you can use the FirebaseControl class to get the list of documents using the function searchForDocumentToSign. This returns the list of files to sign for the current user logged into the app.
Once we have our document, we can prepare it and start to build our Viewer, first by hiding the form fields not assigned to the current user.
Displaying Only Assigned Fields
To do this, we search the document downloaded from Firebase for all the annotations and remove those that do not have the CustomData set to the current user’s email address.
fun removeAnnotationsForOtherUsers(file: File): File {
   val currentUser = Firebase.auth.currentUser
   val doc = PDFDoc(file.absolutePath)
   for (pageNumber in  1..doc.pageCount){
       val page = doc.getPage(pageNumber)
       if(page.isValid){
           val annotationCount = page.numAnnots
           for (a in annotationCount downTo 0){
               try {
                   val annotation = page.getAnnot(a)
                   if(annotation == null || !annotation.isValid){
                       continue
                   }
                   if(annotation.getCustomData("email") != currentUser?.email){
                       page.annotRemove(annotation)
                   }
               }
               catch (e: PDFNetException) {
               }
           }
       }
   }
   doc.save()
   return File(file.absolutePath)
}
Signature Capture
The document is now ready for other users to complete! The viewer config here for completing documents will be the same configuration used previously. But this time, we hide the toolbar to avoid users adding more fields:
fun showDocument(docId: String, file: File) {
   showProgressDialog()
   this.docId = docId
   val fileForThisUser = removeAnnotationsForOtherUsers(file)
   val config = createViewerConfig()
   config.showAppBar(false)
   mBasicAnnotationListener = MyBasicAnnotationListener()
   mPdfViewCtrlTabHostFragment =       ViewerBuilder2.withFile(fileForThisUser).usingConfig(config.build()).build(this)
   mPdfViewCtrlTabHostFragment.addHostListener(
       MyTabHostListener(
           { showBottomBar(true) },
           mPdfViewCtrlTabHostFragment,
           mBasicAnnotationListener
       )
   )
   showPdfViewCtrlTabHostFragment()
}
Check to See Each Field is Filled
Before we send the user's annotation data back to Firebase as an XFDF string, we need to check that all fields have been filled. We again search through the file for all annotations and check that each one. See the example below for Signature and TextWidget annotations. (The full function can be found in the Utils class on GitHub -- function name: areAllSignAndDateFieldsComplete.)
if(annotation.type == Annot.e_Widget) {
   val widget = Widget(annotation)
   val field = widget.field
   if (field.type == Field.e_signature) {
       val signatureWidget = SignatureWidget(annotation)
       if (!signatureWidget.digitalSignatureField.hasVisibleAppearance())
           return false
   }
   if (field.type == Field.e_text) {
       val textWidget = TextWidget(annotation)
       if (textWidget.text.isEmpty())
           return false
   }
}
After validating our input, we then extract the XFDF information and send it to our Firebase storage.
Confirm All Users Have Signed
Next, we should check to see if all users collaborating on a document have filled and signed their assigned fields.
pdfViewCtrlFragment.currentPdfViewCtrlFragment.pdfViewCtrl.docLock(true) {
   //check if everyone has signed
   if (document.signedBy.count() == document.emails.count()) {
       document.signed = true
       document.signedTime = now()
       updatedFile = flattenAllAnnotationsAndUploadDocument(
           document.docRef,
           filePath,
           pdfDoc,
           document.xfdf
       )
   }
}
Combine Captured Signature Data on Firebase
Finally, having performed our two checks, we can safely merge all the collected XFDF information, update the file in Firebase, and mark it as complete.
See the FirebaseControl class, function updateDocumentToSign for an example.
For the completed ‘signed’ document in storage, annotations from all users are merged into the same PDF file via a process known as flattening.
private fun flattenAllAnnotationsAndUploadDocument(
   docRefString: String,
   filePath: String,
   pdfDoc: PDFDoc,
   fdfStrings: List<String>
): File {
   val storageRef = Firebase.storage.reference
   val docRef = storageRef.child(docRefString)
   for (fdf in fdfStrings) {
       val fdfDoc = FDFDoc.createFromXFDF(fdf)
       pdfDoc.fdfMerge(fdfDoc)
       println(fdf)
   }
   pdfDoc.lock()
   pdfDoc.flattenAnnotationsAdvanced(
       arrayOf(
           PDFDoc.FlattenMode.ANNOTS,
           PDFDoc.FlattenMode.FORMS
       )
   )
   pdfDoc.save()
   pdfDoc.unlock()
   val updatedFile = File(filePath)
   docRef.putFile(Uri.fromFile(updatedFile))
   return updatedFile
}
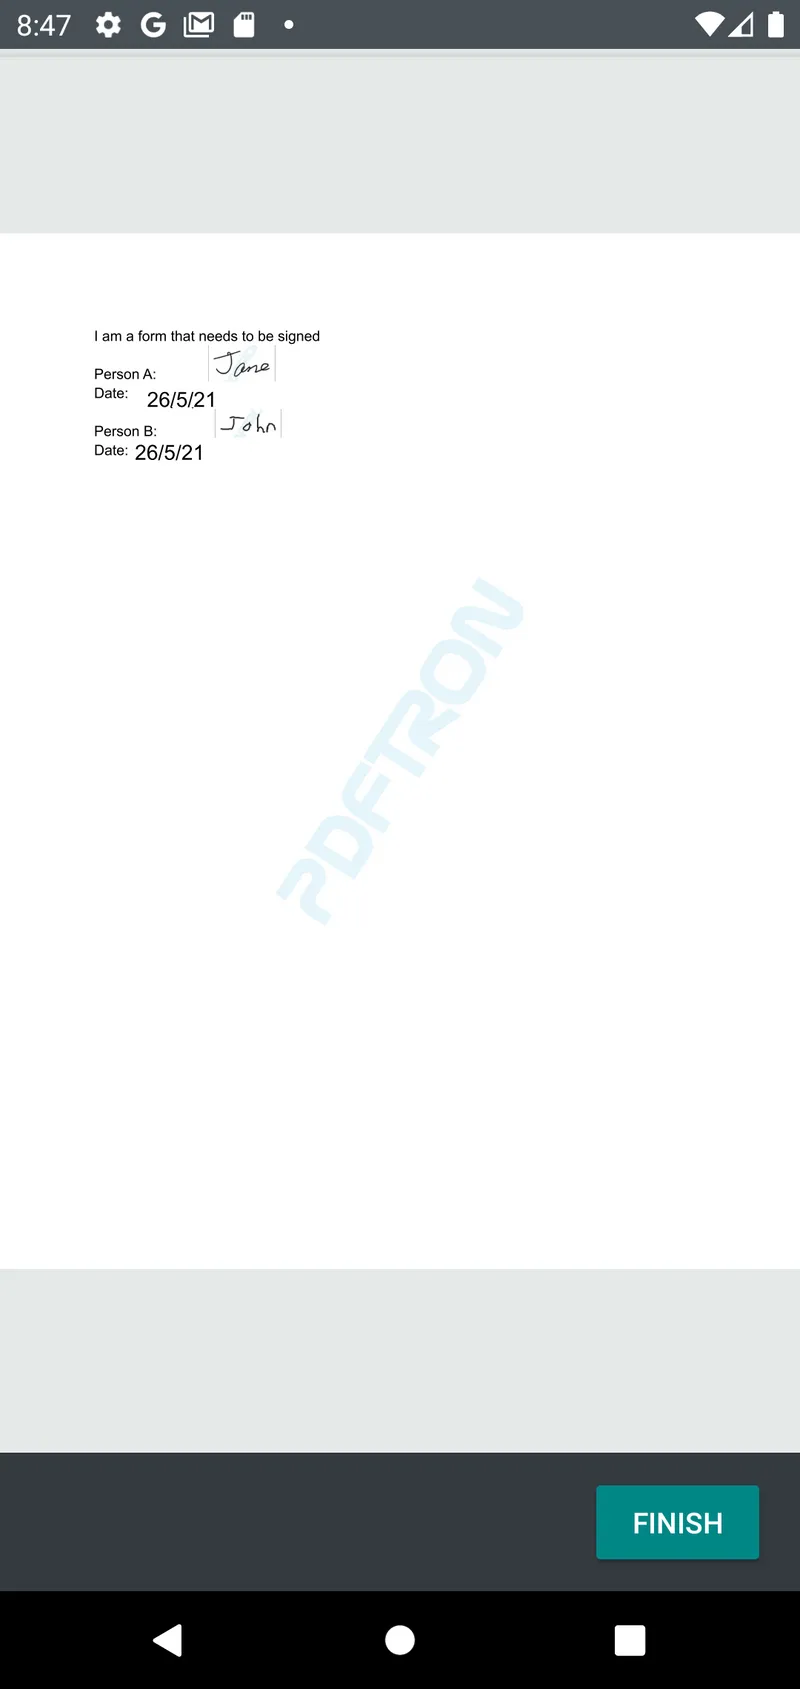
Viewing The Completed Document
Last but not least: we want to let users view the completed document with everyone’s signatures! A function in our FirebaseControl called searchForDocumentsSigned will fetch all completed documents for viewing.
As before, we hide the toolbar to prevent users from adding further annotations. And the result looks like this:
Wrap Up
That’s it! You should now have a complete signing app that lets your users add fillable fields to documents like contracts, assign these fields to other users to complete, and view the final result! Moving on, you can head over to our UI customization guides to see how to tailor the viewer to your desired look and feel.
Have any questions about using the PDFTron SDK in your project? Please feel free to contact us and we will be happy to help.

Eamon Mallon
Share this post


